Check that your CPU supports hardware virtualization
To run KVM, you need a processor that supports hardware virtualization. Intel and AMD both have developed extensions for their processors, deemed respectively Intel VT-x (code name Vanderpool) and AMD-V (code name Pacifica). To see if your processor supports one of these, you can review the output from this command:
egrep -c '(vmx|svm)' /proc/cpuinfo
If 0 it means that your CPU doesn't support hardware virtualization.
If 1 or more it does - but you still need to make sure that virtualization is enabled in the BIOS.
By default, if you booted into XEN kernel it will not display svm or vmx flag using the grep command. To see if it is enabled or not from xen, enter:
cat /sys/hypervisor/properties/capabilities
You must see hvm flags in the output.
Alternatively, you may execute:
kvm-ok
which may provide an output like this:
INFO: /dev/kvm exists KVM acceleration can be used
If you see :INFO: Your CPU does not support KVM extensions KVM acceleration can NOT be used
You can still run virtual machines, but it'll be much slower without the KVM extensions.
NOTE: You may see a message like "KVM acceleration can/can NOT be used". This is misleading and only means if KVM is *currently* available (i.e. "turned on"), *not* if it is supported.
Use a 64 bit kernel (if possible)
Running a 64 bit kernel on the host operating system is recommended but not required.
To serve more than 2GB of RAM for your VMs, you must use a 64-bit kernel (see 32bit_and_64bit). On a 32-bit kernel install, you'll be limited to 2GB RAM at maximum for a given VM.
Also, a 64-bit system can host both 32-bit and 64-bit guests. A 32-bit system can only host 32-bit guests.
To see if your processor is 64-bit, you can run this command:egrep -c ' lm ' /proc/cpuinfo
If 0 is printed, it means that your CPU is not 64-bit.
If 1 or higher, it is. Note: lm stands for Long Mode which equates to a 64-bit CPU.
Now see if your running kernel is 64-bit, just issue the following command:uname -m
x86_64 indicates a running 64-bit kernel. If you use see i386, i486, i586 or i686, you're running a 32-bit kernel.
Note: x86_64 is synonymous with amd64.
Installation of KVM
Install Necessary Packages
For the following setup, we will assume that you are deploying KVM on a server, and therefore do not have any X server on the machine.
You need to install a few packages first:
Lucid (10.04) or later$ sudo apt-get install qemu-kvm libvirt-bin ubuntu-vm-builder bridge-utils
Karmic (9.10) or earlier$ sudo aptitude install kvm libvirt-bin ubuntu-vm-builder bridge-utils
libvirt-bin provides libvirtd which you need to administer qemu and kvm instances using libvirt
qemu-kvm (kvm in Karmic and earlier) is the backend
ubuntu-vm-builder powerful command line tool for building virtual machines
bridge-utils provides a bridge from your network to the virtual machines
You might also want to install virt-viewer, for viewing instances.
Vmware ESXi
I will explain the steps required to run a nested KVM hypervisor on Vmware ESXi. The installation of KVM is done on Ubuntu 13.10(64 bit).
Note: It is assumed that you have already installed your Ubuntu 13.10 VM in ESXi, and hence we will not look into the Ubuntu installation part.
1) Upgrade VM Hardware version to 9.
In my ESXi server, the default VM hardware version was 8. So I had to shutdown my VM and upgrade the Hardware version to 9 to get the KVM hypervisor working. You can right click the VM and select the Upgrade hardware option to do this.
2)In the ESXi host In /etc/vmware edit the 'config' file and add the following setting
vhv.enable = "TRUE"
3)Edit the VM settings and go to VM settings > Options > CPU/MMU
Virtualization . Select the Intel EPT option

4) Go to Options->CPUID mask> Advanced-> Level 1, add the following CPU mask level
ECX ---- ---- ---- ---- ---- ---- --H- ----
5) Open the vmx file of the Ubuntu VM and add the following setting
monitor.virtual_exec = “hardware”
hypervisor.cpuid.v0 = “FALSE”
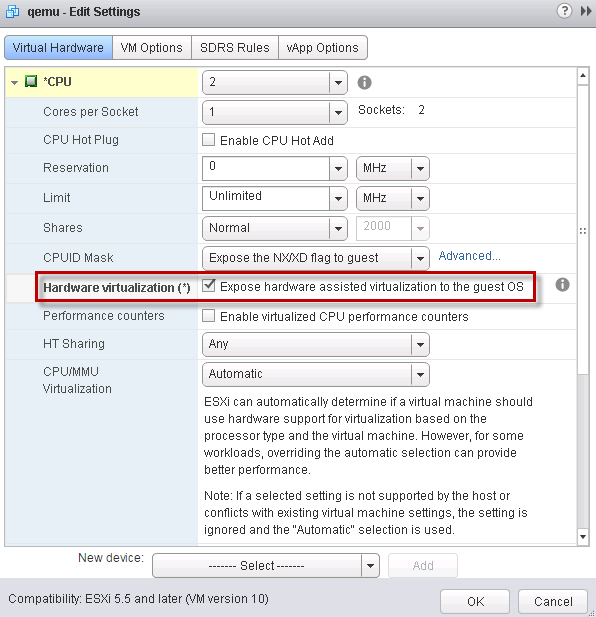
To be able to run either Qemu or KVM on top of ESXi, you just need to create a Virtual Machine running Virtual Hardware 10 and enable the (VHV) Hardware Assisted Virtualization feature which available in the vSphere Web Client as seen in the screenshot below: